Best Car Photography Settings – Always get the perfect shot
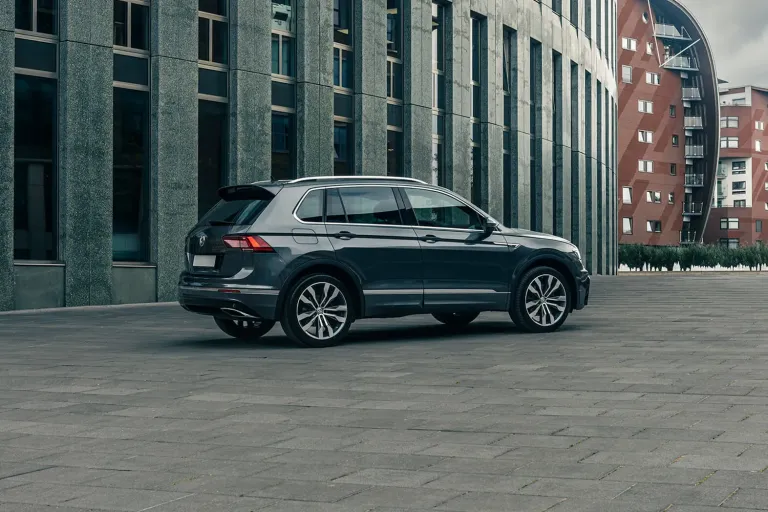
Car photography is a lot of fun to do, capturing the fastest, most beautiful, and most exclusive cars in a way that enhances the lines and emotion. However, finding the best car photography settings is a different story, which is often difficult.
With years of experience as a car photographer, I must say that I have mastered this, changing all the settings to get the perfect car picture. My goal is that you too can apply all the tips and tricks.
In this article, I will tell you exactly which tricks I use to get the best car photography settings and thus get the best picture. I have collected these tips through personal experience so you can apply them immediately!
What are the best settings for car photography?
Car photography is a profession in itself and you have different camera settings for every situation. Well, the definition of settings is quite broad, let me first clarify that. Camera settings often refer to ‘shutter speed’, ‘ISO’, and ‘aperture’, but there are many more settings.
Let me first explain these three settings, which are the basis of car photography.
Shutterspeed, ISO & Aperture
The shutter speed of a camera is the period during which light can hit the sensor. The longer the shutter speed, the brighter the photo. For example, a shutter speed of 1/50 of a second is a lot longer than 1/1000 of a second. This means that the light can hit the sensor 20 times as long at a shutter speed of 1/50 of a second.
ISO refers to the sensitivity of the sensor, this number is often expressed in 100, 200, 400, etc. The higher you set the ISO, the brighter (lighter) the photo becomes. The advantage is that you can freeze the action with a high ISO, but the disadvantage is that you get more noise in the photo.
Finally, we have the aperture, which is how much light can pass through the lens. This number is expressed in F-stop. An example of this is F1.8, F3.5 and F8.0. You can play with this a lot because you can adjust this on every lens. The combination of these three settings determines how bright/dark your photo is.
Focus settings
This setting is often forgotten among car photographers but it can really make the difference between a sharp and blurry photo. Many new cameras have extensive autofocus options, such as tracking with AI. My camera (Canon EOS R6) has that and I use it all the time.
Since I have this function, I can take photos a lot faster, which saves time, so I can often visit multiple car locations in a shorter time. If you have a camera without tracking, I recommend shooting on single-point AF and placing it in the center. This is often the most accurate autofocus point.
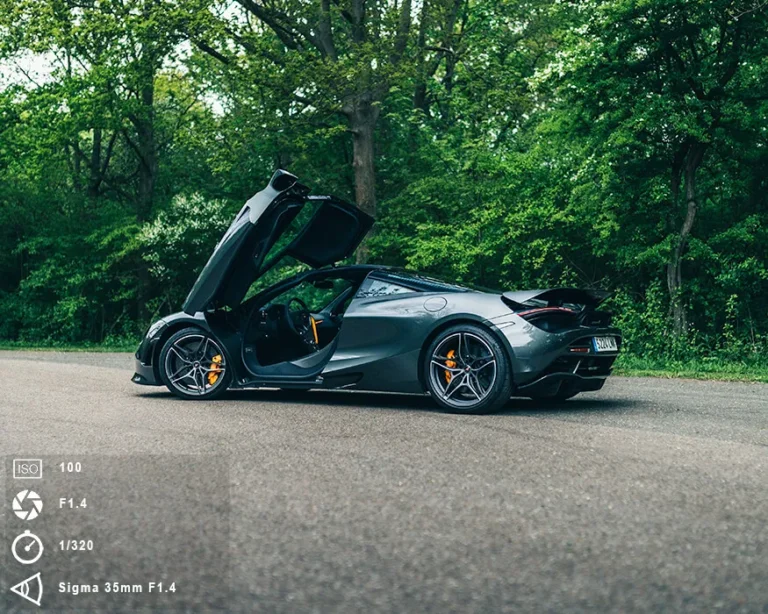
Static shots
To start with the first settings I have to keep it simple. Static photos are generally the simplest photos to take in terms of technology. The car stands still and in principle, you do not have to use complicated combinations of ISO, aperture, and shutter speed.
When taking static photos in bright sunlight, you should use a faster shutter speed. I often use the following settings for static car photos:
ISO: 100 – Shutter speed: 1/250-1/500 – Aperture: F1.4-F4.0
Let me quickly explain why I use the above settings for car photography. For static photos, the car stands still, so I don’t have to use a very fast shutter speed or high ISO. The lowest possible ISO is then preferred.
I often have the aperture set to F4.0, because the car is completely sharp while the background is still a bit blurry. I have also noticed that the lens is often the sharpest around this aperture. For an even blurrier background, you can use F1.4, but you have to take into account that the car will not be completely sharp.
Finally, I adjust the shutter speed depending on the lighting conditions. When there is bright sunlight I use 1/500-1/1000 of a second, but when it is cloudy the shutter speed can quickly go to 1/160-1/250 of a second.
Rolling shots (Moving car shots)
The second type of photo is the rolling shot, also called moving car shots. With this technique, you can really visualize a lot of movement, which can give people a sense of speed. I think this is one of the most fun types of shots to make during a car photo shoot.
However, the technique behind this is also one of the most difficult to master, the settings for rolling shots can be complicated. Again the settings are never the same, but I often use the settings below during moving car shots.
ISO: 100 – Shutter speed: 1/20-1/50 – Aperture: F5.6-F11
This time too I will explain the settings so that you can understand them and apply them yourself. Just like the previous shot, I set the ISO as low as possible, because the light can illuminate the sensor for a very long time. An ISO of 100-200 will be low enough for rolling shots.
It is immediately noticeable that the shutter speed is a lot longer than the static shot because this is the setting that ensures a moving effect. The longer the shutter, the more movement. I find a shutter speed of 1/20-1/50 perfect for moving car shots, so I have a lot of movement and also many sharp photos.
You often cannot see whether a photo is completely sharp on the small screen of the camera, so I do not recommend a longer shutter speed. To compensate for this shutter speed I use a small aperture, around F5.6-F11 should be sufficient. If the image is still too bright, I recommend an ND filter.
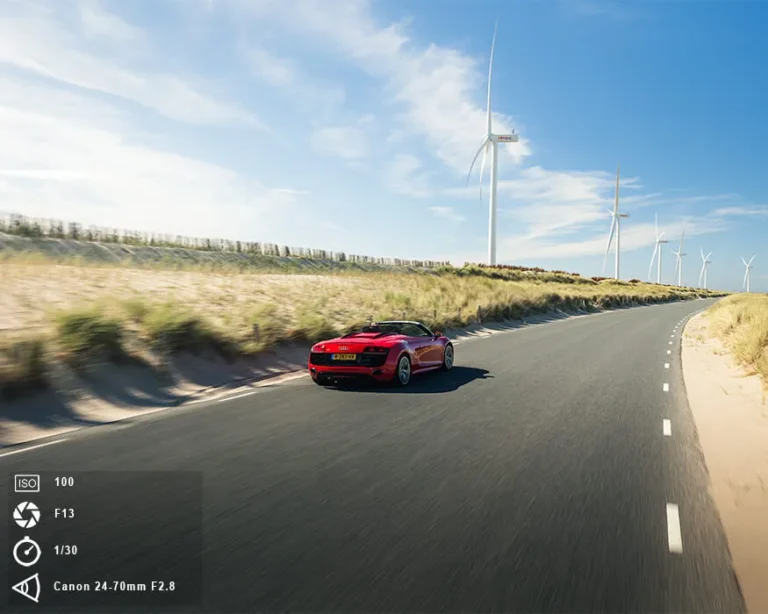
In the photo above you can see that I photographed an Audi R8, I have included the settings I used. With each of the following photos, I will explain what my way of thinking was to achieve the result.
To start with this one, we were driving about 30 km/h (18 mp/h) in a car behind the main subject. I sat on the door with the window open so I could hold myself. With a shutter speed of 1/30, I was able to capture enough movement.
I of course set the ISO as low as possible and the aperture in this photo was F13, which is quite small. I recommend that you order an ND filter to prevent this, most lenses become less sharp after F11 due to diffraction.
Night car photography settings
Car photography in the night is a completely different kind of sport because here you have to pay close attention to the settings. If the environment is dark, you can do two things: set the camera so that the light can hit the sensor for a very long time, or use an external light source to light up the car.
If you are not using a light source, you need a tripod to prevent movements that blur the image. I often use the following settings for car photography at night:
ISO: 800-1600 – Shutter speed: 5s-10s – Aperture: F1.4-F2.8
Because it is so dark, you have to use a long shutter speed so that the camera can still get enough light to take a balanced image. You should open the aperture as much as possible so the lens can let in a lot of light.
The ISO depends on the situation, use a higher ISO if needed. Often an ISO of 800-1600 is good enough, but sometimes you also need to use a higher ISO. Getting the exposure correct in the camera is crucial, it is hard to fix an underexposed shot at night.
When you use a light source such as a light bar. You should use the same settings as above, but a slightly lower ISO. This makes the photo a lot ‘cleaner’ and the car is well exposed through light painting.
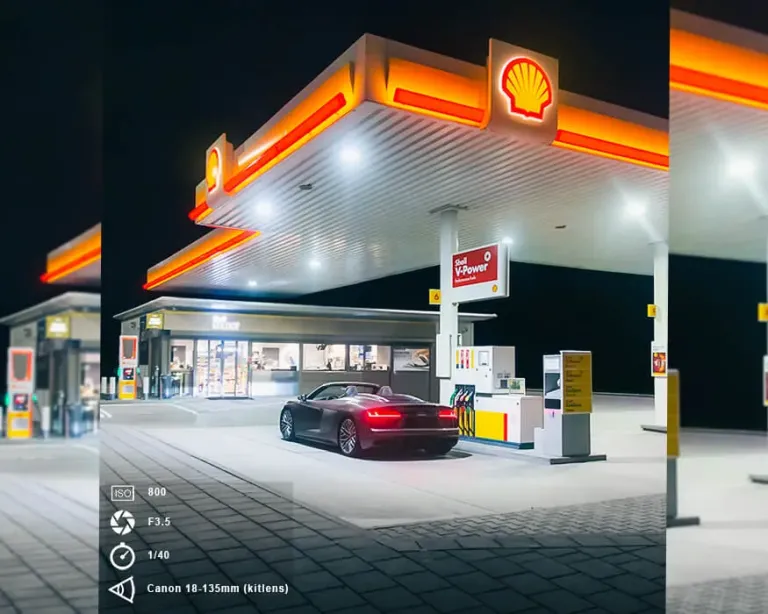
don’t often go out with a car in the night, I took this photo in 2020, so it was a while ago. I used a Canon 70D for this, which is not the newest or most expensive camera. That just goes to show that you don’t need the most expensive camera for car photography.
The lens was an 18-135mm lens, which I set to 18mm for this photo. The largest aperture is F3.5, so set that. The lens has stabilization, so I could have set the shutter even longer, but I chose not to in this case.
With a shutter of 1/40, I am sure that the photo will be sharp, but because I forgot a tripod I cannot set the ISO to 100, otherwise the photo would be too dark. An ISO of 800 gets you quite far, so this is how I arrived at the settings for car photography at night.
Sunset car photography
I often take the most beautiful photos during a sunset, with the golden glow in the background you can take truly unique photos that will appeal to everyone. I do notice one problem that I often have during sunsets: the car is often too dark or the sky is often too bright.
Fortunately, I found a solution to solve this problem. The settings you should use during a sunset vary greatly per situation. To prevent the car from being too dark or the sky too bright, you can create an HDR. You do this by taking three photos with different settings.
I often use the following settings for this:
ISO: 100 – Shutter speed: 1/80-1/160-1/320 – Aperture: F1.4-F4.0
The settings for sunset car photography are fairly simple, you have a standard ISO and aperture. I often use ISO 100 and an aperture of F1.4-F4.0. Then you can take three photos with the following shutter speeds: 1/80-1/160-1/320. Finally, you can merge these three photos to have one photo where the car is not underexposed and the sky is not overexposed.
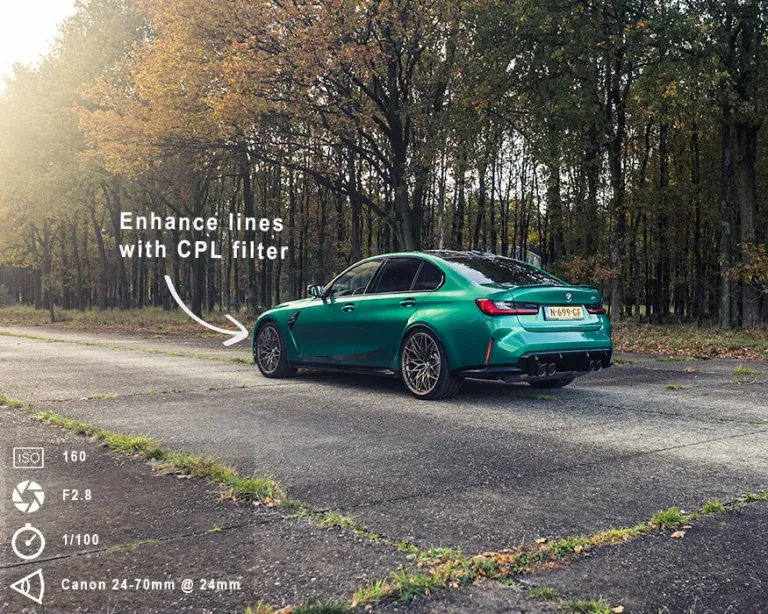
In this photo, you can see the golden glow that I was just talking about, at the top left it gives a nice effect. I made sure that the sun is not directly visible, so you avoid ugly flares that reduce the contrast.
The settings are fairly straightforward, with the ISO relatively low and the aperture wide open. When it comes to shutter speed, I adjusted it to the situation, in this case, it was 1/100.
Here you can see the use of the CPL filter, which is the next topic I will talk about. The lines come out nicely by turning the filter to the side of the car.
Reflections (CPL filter)
During every situation I mentioned above you will suffer from reflections, and to prevent this you can use a Circular Polarization Filter (CPL). By turning it you can remove some of the reflections on the car.
I certainly do not recommend that you always use a CPL filter, because in my opinion car photography is also about the environment and how the car reacts to the environment. You can often use the environment to make the lines of a car stand out more. If mastered, this can be a powerful tool.
You should take the location of a car photoshoot as a high priority, it can make or break the images.
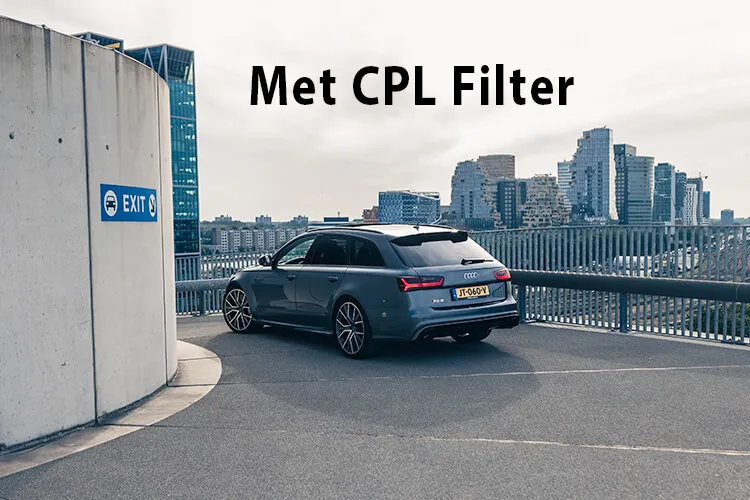
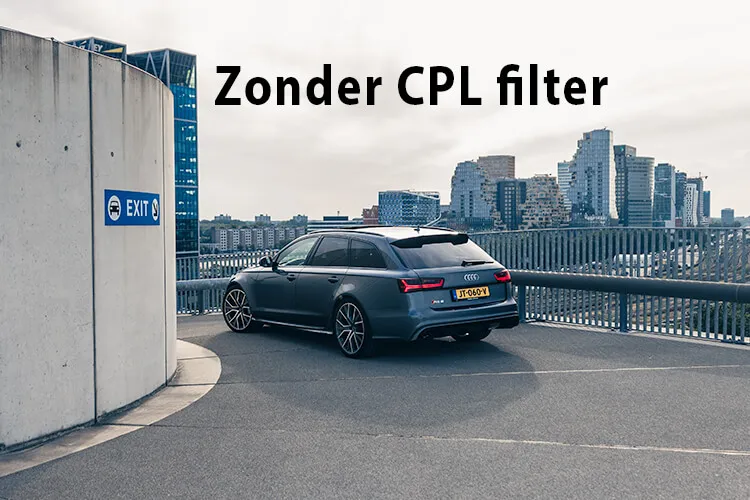
In the top photo, I have turned the CPL filter onto the side of the car. I recommend that you rotate the filter so that the largest surface of the car is reflection-free. In this case, it is the side, but sometimes it is also the back or front.
You can see in the photo below that the filter has been turned away, making the reflection visible again. I like the bottom one here more because I think the reflection adds to the photo and atmosphere. The lines of the car stand out much better and this is the better option.
Play around with a CPL filter and try a lot. I often take multiple images where I turn the filter around in between the photos, this way I can choose later on which one I like more.
Choosing the right lens
I say it again and again, lens choice is one of the most important aspects of car photography. It is not about whether a lens is expensive or cheap, how good the quality is or not. It’s about the effect each lens can have on a car and its environment.
A wide lens can distort the car and take in a lot of the background, while a telephoto lens compresses the background very much and puts the focus on the car. Both types of lenses have their pros and cons, my preference is a 24-70mm.
You can’t use just every lens for any angle that’s why the 24-70mm is my favorite.
Editing tips
Finally, I can’t leave this out, because taking the photos is only half the job. The other half is where the magic happens, if you have mastered editing well you can give beautiful effects to a photo.
I’m not saying that you should Photoshop everything, I prefer a natural look because it is timeless and will still be beautiful in 10 years. I’ve tried a lot in the past and that’s the only way you can learn.
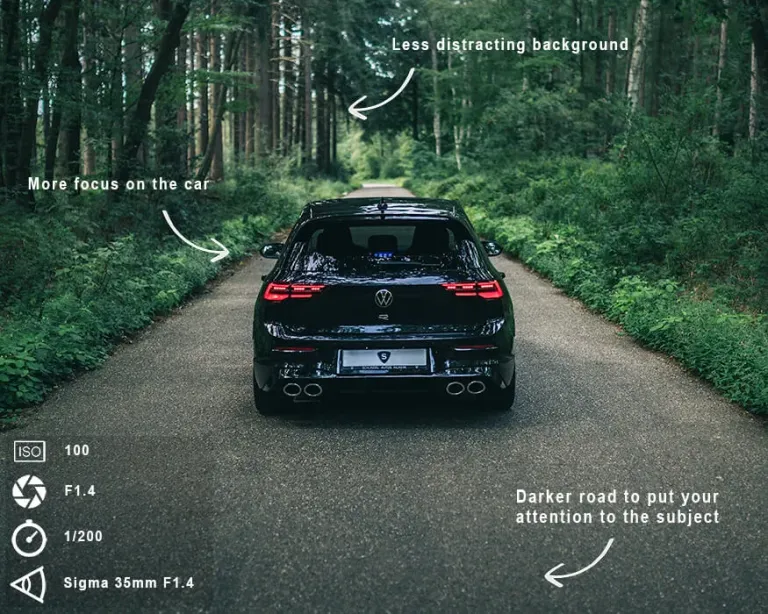
I can give you a few tips, for example by placing a mask on the car and increasing the clarity, you can clarify the lines of a car. You can do the opposite for the background, by lowering the clarity of the background you can take the focus away from it.
Try to work with different masks and add gradients, so you can draw more attention to the car and put the finishing touches. You often have no control over situations, for example, a dirty road surface. You can also fix this in Photoshop, just look up some tutorials online.
I will explain in detail how to add masks below!
How to add a mask in Lightroom for car photos?
In the next series of photos, I will explain to you which masks I added to get the top result with an explanation of Lightroom. So you can copy it to improve your results.
In the photo above you can see what adjustments I am going to make to draw attention to the car, they are handy tricks that you could use.
Make sure you have enabled ‘Color Overlay‘ at the bottom left of ‘Overlay Mode‘, so you have the same settings as I do.
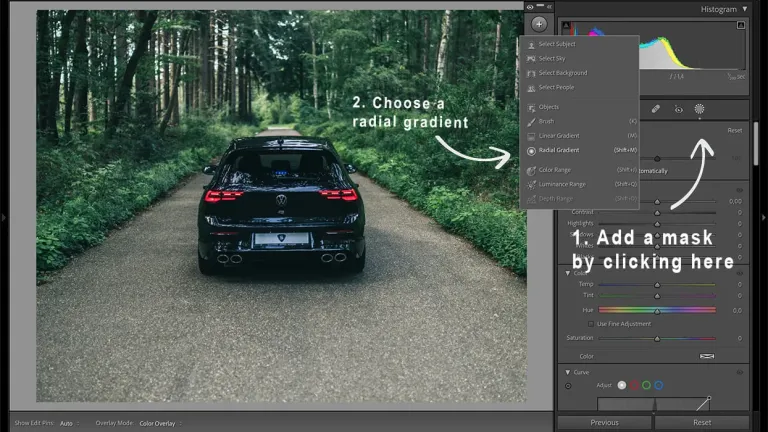
1. In Lightroom you can adjust many editing settings, one of which is adding masks. This way you can adjust one part of the photo while the other parts remain unedited. Click on the logo that you see by the arrow.
2. By clicking on the ‘+‘ (at the top of the screen) you will get a whole menu with mask options. First, choose the ‘radial gradient‘, this is a circle that you can adjust yourself.
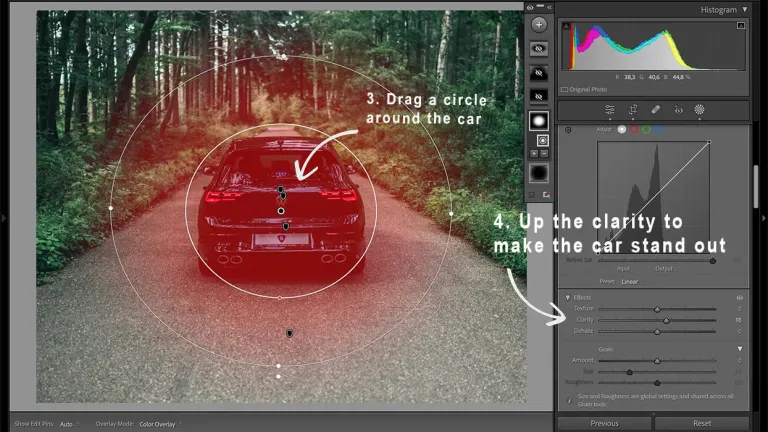
3. The next step is to draw a circle over the car so that the car is completely red. It doesn’t matter if you take a little more of the environment in your selection, it makes the whole look better in my opinion.
Make sure the feather is not too small, as I showed above is about what I always use.
4. Make sure you increase the clarity, clarity ensures that more contrast, sharpness, and detail are added. I do this to make the car look better.
Be careful not to do this too much, it can also be very distracting when overdone.
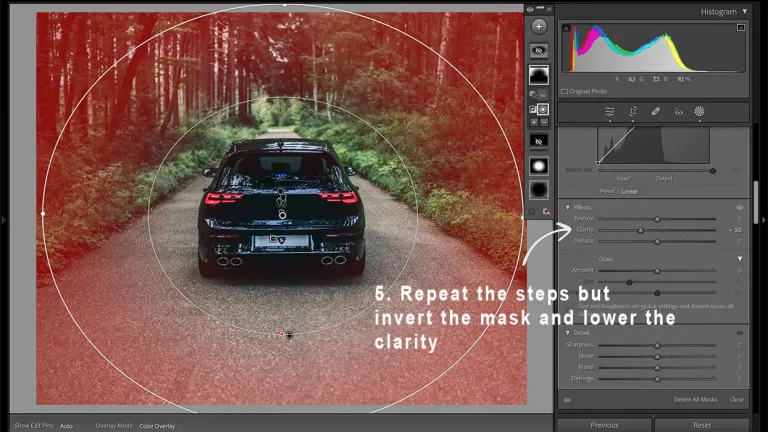
5. Then repeat steps 1 to 3, this time clicking on ‘invert mask‘. You can see that button at the top under ‘feather‘. If you check this you will see everything around the circle red.
In this case, make sure you lower the clarity to ensure that less sharpness and detail are visible, so the background is less distracting. This setting is a must, especially in wooded areas.
What you can do is reduce the exposure by -0.10/-0.50. That way the environment is slightly darker than the car and that also ensures that attention is drawn to the car.
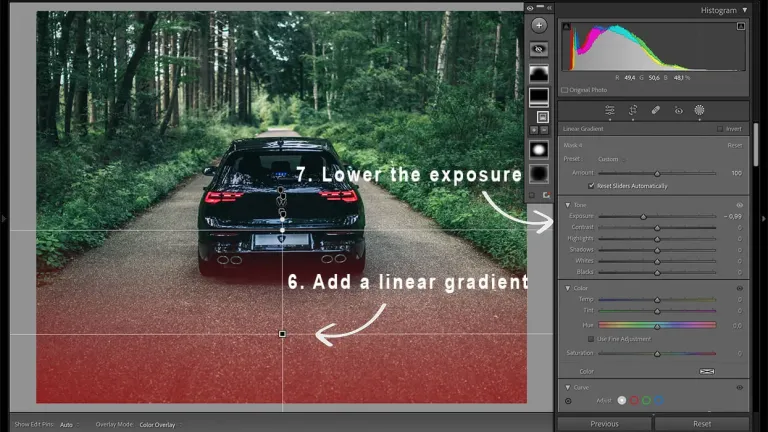
6. Finally, you can darken the bottom of the photo so that it is less distracting. All in all, you will ensure that the attention automatically goes to the car and not the road.
First, make sure you apply a linear gradient to the bottom. The red part is what you will adjust, so it should be at the bottom of the line.
7. As a final step, set a lower exposure, making the road (bottom) darker than the rest. I never do this too dark, by doing everything subtly the photo remains a beautiful whole.
These were all the steps you need to take to add the masks, it’s a fairly simple process and you just need to know how to do it. Make all settings subtly and do not set +100 or -100 clarity, then it will look more like a drawing than a beautiful photo.
Conclusion
Now that I have given you a few tips for car photography settings, you can start applying them in real life. You can read countless guides, watch videos, or buy courses, but you won’t learn anything if you don’t apply it.
So I give you an assignment, go out with your camera and car, it doesn’t matter which one. Try out a new technique, whether it’s rolling shots, night car photography, or sunset photos. When you have tried the settings and have a result you can send it to me. I may be able to give you some additional tips.
Don’t forget to share these tips with our fellow photographers via the buttons below, I believe we should be there for each other and we all benefit if you too can take beautiful photos with the right car photography settings.
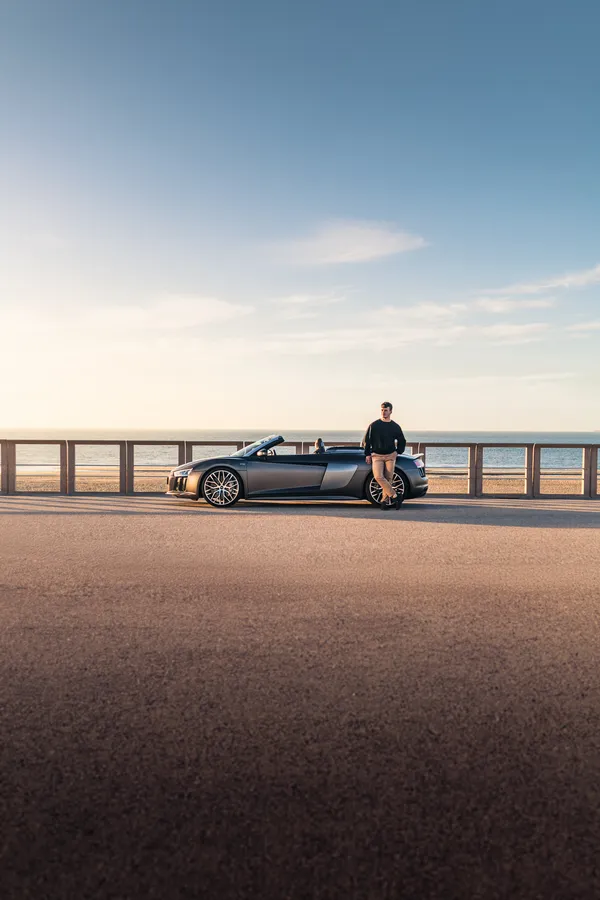
Who is Sebastiaan?
Hi! I am Sebastiaan, the writer of this blog. With years of experience as a professional photographer, I want to share my expertise with you. From recommending cameras and lenses to giving tips that make a world of difference, that is what I love to do most.